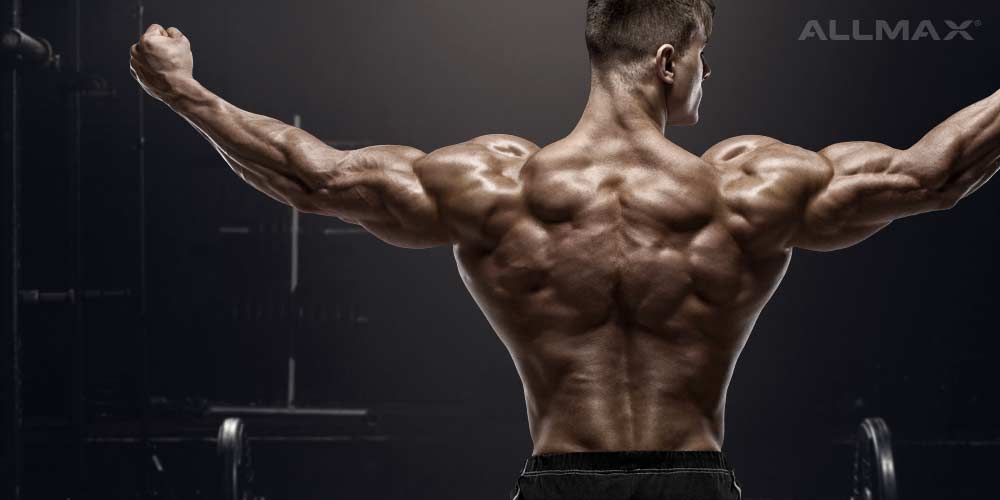
Out of all of the exercises that you can use to build strong and powerful lat muscles, none are more powerful than the chest-supported row. In contrast to chin-ups and deadlifts, each of which tends to hit only one part of your back, chest-supported rows target both the upper and lower halves of the entire lattisimus dorsi complex. This makes them the perfect accessory exercise to stack on top of your favorite full-body lifts. ‘ While many lifters prefer to do chest-supported rows on the main training day for their back, others adopt a conjugate approach and work in several sets of these rows on a squat day or a bench day. If you’re willing to dial back the poundage a little bit, then you’ll also find that the chest-supported row makes an excellent warmup exercise. The combination of lat activation and scapular retraction helps fire up your entire body without leaving you fatigued. Regardless of how you use them, chest-supported rows give you the targeted hypertrophy that every bodybuilder dreams of.
Understanding The Musculature The Back
To understand what makes the chest-supported incline row so powerful, you first need to understand a bit about how the main muscle groups in the back are woven together. More specifically, these seven groups account for roughly 90% of the musculature in your back:- Rear Deltoids – The rear deltoids stretch from just above your scapula to underneath the first rib. This muscle group is involved in overhead pressing exercises, and it also provides support for gymnastic feats like handstands, headstands, and muscle-ups.
- Teres Minor – The teres minor is located under the rear deltoid. Its primary roles are to stabilize the head of the humerus and to help your arm perform lateral rotations. Technically, the teres minor is also a part of the rotator cuff.
- Teres Major – As its name would suggest, the teres major is significantly larger than the teres minor. The teres major rests on the lower half of the shoulder blade, and it is one of the secondary muscles used in the chest-supported row.
- Trapezius – The trapezius, also known as your “traps,” is one of the largest muscle groups in the back. This muscle group begins in the middle of the back, widens out significantly towards the shoulder blades, and stretches up past the beginning of the neckline.
- Rhomboid Major – Like the teres major, the rhomboid major is a very important muscle group that is exercised during the chest-supported row. Since the rhomboid major’s primary role is to connect your spine to your shoulder blades, this group of muscles helps to retract your scapula during the concentric part of a pulling exercise.
- Erector Spinae – This small but important muscle group gives your spine the ability to flex, rotate, and extend as necessary. The dumbbell version of the chest-supported row is one of the most reliable exercises for developing your erector spinae.
- Lattisimus Dorsi – The lattisimus dorsi is the largest single muscle in the upper body. When this muscle is exercised and built properly, the result is a “bat-wing” look that widens out your frame and adds an impressive silhouette to your physique. Among its many important roles, the lattisimus dorsi plays a supporting role in lumbar flexion and lumbar extension.
How Chest-Supported Rows Build The Major Muscles Of Your Back
By taking your legs out of the equation, chest-supported rows place all of the lifting load onto the teres major, the lattisimus dorsi, the trapezius muscles, and the rhomboid major. During the concentric portion of the row, the lats play a stabilizing role and pick up the slack for any muscle groups that need help. Many lifters like to really squeeze lats the top of the lift and retract the deltoids as much as possible. By squeezing the lats and contracting the deltoids at the point of maximum tension, you can further isolate these muscle groups and transform a portion of this lift into an isometric exercise of sorts. During the eccentric portion of the lift, you are forced to coordinate your back muscles in concert with one another to slowly and deliberately lower the weight back to the starting point. Whether you use a barbell, a set of dumbbells, or a single dumbbell in an alternating fashion with each arm, the eccentric phase of the chest-supported row is where most of the hypertrophy occurs. As you vary the angle and the amount of weight that you perform the exercise with, you can customize the chest-supported row to hit any of the major muscle groups described in the section above. In addition, you can deliberately target certain types of muscle fibers by changing up your tempo. For example, wrestlers who want to train fast-twitch muscle fibers for explosive pulling motions can perform the chest-supported row with light weight and fast repetitions. Football players, by contrast, may want to go as heavy as possible to simulate several seconds of a hard-fought battle at the line of scrimmage.Properly Performing The Chest-Supported Dumbell Row
No matter what kind of weights you’re using, the first that you’ll need to do a chest-supported row is find a bench to brace your chest against. This can be a flat bench or an incline bench. If you want to do several sets at various angles, then make sure to grab a bench that has adjustable settings. Ideally, your bench will also have a rack for holding your weights attached to it. After you’re set up with your bench, you’ll want to load up your barbell with some plates or grab yourself a set of dumbbells. If you are using dumbbells on an incline bench, then you may also want to grab a flat bench to rest your weights on. To get the most out of the chest-supported row, you always want to end the concentric portion of the row with your arms fully contracted and end the eccentric portion with your arms fully outstretched. Thus, we recommend leaning over the bench without any weight in your hands first to make sure you have enough room. If there is a distance of at least six inches between your outstretched fingertips and the ground, then you have enough room. The last thing that you want to happen is to have your knuckles crushed under the weight you’re lifting when you lower it to the floor. It’s far better to leave a bit too much room and have to drop the weight onto the floor than to have not enough room and get jammed up while you’re performing your rows. After you’re properly set up with your bench and some weights, follow these steps in order: 1. To begin the exercise, place your chest against the bench while keeping your feet flat. If you’re having trouble keeping your feet flat, then take that as a sign that your ankle flexibility can use some work. 2. Grip the weight firmly. You want a tight enough grip to prevent the weight from slipping, but you don’t want your grip to be so tight that your fingers get tired in the middle of your set. 3. Take a deep breath in before beginning the concentric phase of the row. To give yourself a bit of extra strength, fire your glute muscles before you begin lifting. 4. Lift the weight up in a straight line until each of your arms are locked out at 90 degrees. At no point should the weight that you are lifting move laterally. 5. As you feel your arms begin to lock out, squeeze the back of your shoulders together as much as possible. To help yourself feel the ideal squeezing sensation, pretend you are trying to use your shoulder blades to crush a grapefruit that is in the middle of your back. 6. Slowly lower the weight down until your arms are fully outstretched. If you feel yourself starting to lose control of the weight on the way down, drop the weight immediately. It’s better to let the weight go than let it pull your shoulder joint out of the socket. The exact rep scheme that you use for the chest-supported row should be determined by your training goals. It’s virtually unheard of to see the chest-supported row performed for a one-rep max, but this exercise is sometimes used with high weights for low reps in various bodybuilding circles. If you’re looking for hypertrophy, then a range of between five and eight reps is usually optimal. If you’re using the chest-supported row to warm up or enhance your flexibility, then you’ll be better off doing 10-15 reps with lighter weight. Regardless of the exact rep scheme that you choose, the chest-supported row can:- Build strong and flexible lats
- Improve your posture
- Improve your shoulder flexibility
- Give you better grip strength
- Boost your flexibility
- Reduce your back pain